Friday, February 17, 2012

How-to: Tightlining. The better way to line your eyes.


Eyeliner, is not just for the top of the eyelid anymore! Well, it hasn't been for some time, but the Tightlining Method isn't as popular as it should be.

What is Tightlining?
Tightlining accentuates the existing lashline by coloring the space between the eyelashes. It allows for more room on the eyelid for color (helps those of us with "hooded" eyes) and gives a more natural emphasis than a pencil or powder liner. Sounds hard you may be thinking; it's not. It's surprisingly easier to master with the right tools and a just a little practice.

The Tools You'll Need
Originally, I was taught the Tightlining method with a pencil, wet to dry eyeshadow, brush and water. The result was great. Incredibly messy, but great. The pencil and wet/dry shadow thickened the base of the lashes and made the lashes mimic false eyelashes. Then the process was consolidated to a cake eyeliner which was fantastic, until the cake liner formula was changed and now it crumbles and flakes. Boooo! What oh what to do?? Most conventional liquid eyeliners come in some sort of brush-in-handle combination where the brush is built for top of the eyelid application. Doesn't help for tightlining.

I found an alternative! Actual liquid liner, no brush included in the cap! For about $20 US, the MakeUpForever Aquarelle paint is perfect. It wears great due to Film Forming PVP Polymers, translation? The pigments dry down and bond quickly which means minimal flaking and long wear without being waterproof. Why don't I want waterproof tightliner? Because waterproofing agents can irritate your eye. The Tightlining technique puts the liner right near the eye. Unless you want to be rubbing your red eyes all day, you want to avoid irritants.

The brush below is a must. Believe me, I've tried and tried to find something similar and every brush I've tried has failed compared to the Mercier brush. The brush itself is about $24 US, but it was absolutely worth every penny. The bristles are thin and flat enough to get right where you need to. Other brushes that may look similar almost always end up being too square or too thick or too flimsy. This brush was MADE for this technique. It's one that use every day and I've had it for over 8 years. Washing it is easy, just don't squish it and it'll bounce right back to the flat and thin shape you need.


Lightbox_1329540994533.jpeg
The Tools I use.
Lightbox_1329541150371.jpg What's in the cap should be enough for both eyes. 
Lightbox_1329541232167.jpeg Use the back of your hand as a pallet! It's the perfect spot, plus you'll wash your brush and your hand after your done anyway.
Lightbox_1329541361878.jpeg Using your lashes to guide you, take the flat brush and wiggle the bristles in between the lashes. Think of it as coloring in the spaces between them.
Lightbox_1329541458448.jpeg Go back to your pallet as needed, keep the brush thin and flat so you can get between each section. Keep going until you finish the whole lash line.
Lightbox_1329541563526.jpeg See? Like this. Sometimes I "blink down" onto the brush, but not a full blink! Just enough to put a little pressure on the brush and get the eyeliner liquid in between the lashes.

Lightbox_1329541846956.jpeg Now a quick curl of the lashes and some mascara and all done! 
Lightbox_1329541897952.jpeg As you can see, the eyelid is liner free, but my eyes are still defined!
  The befores.
Lightbox_1329541846956.jpeg Lightbox_1329541897952.jpeg The afters! Quite a difference, right?? And no other makeup, including concealer or eyeshadow base was used!


Tightlining is very easy once you get a hang of it. My tricks are to look down into a mirror, that way I can see without having to try and hold my eyelid up and wiggle the brush into my lashes. A handheld mirror has become my super friend for that.
Also, when you're just beginning to tightline, do it first! You can always put your concealer or eyeshadow base over any oopsies (I've done it) that you smudge on your lid. 

Tightlining looks great on everyone and is very easy to build on as far as whatever eyeshadow art you intend to do. From natural to cut creases, from shimmers to mattes! Tightlining is like a little black dress, it's perfect for every look!

Give it a try, see for yourself!

Tuesday, February 14, 2012

In the Land of Lash Curlers

Eyelash curlers. A tool that looks more like a contraption to remove the eyeball than a method of bending and shaping the eyelash. Most are frightened of yanking out all the lashes by the root, or weird looking dents framing their eye. A good general rule of using eyelash curlers:

  1. Do the "Bite-Bite-Bite". If you have no ever-loving clue as to what I'm saying, picture using the curler down the length of your lash, not just the base (nearest to the eyelid). Close and hold the curler at the base of the lash, hold for 3-5 seconds, then slowly and with a less pressure continue to open and close the curler moving down the lash. Use light pressure, as the hair gets thinner towards the tip and can curl too deep and will leave a kink.
  2. Curl your lashes before you put on mascara. Some people like to curl after mascara. In my experience this will result in clumping of mascara and ups the potential for ripping out eyelashes. The mascara thickens the hair and makes the hair catch on the metal/plastic of the curler. To avoid this, just curl beforehand.
  3. Don't be afraid to practice! If you're uneasy about curling your lashes, practice on bare lashes when you have no intention of putting on makeup. My suggestion? Before bed! Get yourself a mirror you can hold and practice! Rushing is the enemy of lash curling. Take your time and practice.
  4. Press and release, don't pull. Remember that you are in control of the curler, not the other way around. Don't pull up or away when the curler is depressed, only move the curler when it's open.
  5. Go slowly. If you pinch yourself, you're going too fast. Slow down. If you feel pressure like you're about to pinch yourself, stop! Open the curler again and adjust the placement.
  6. Clean your curler and replace the pads. Buildup on the curler is natural, as well as dents in the pads. Using a warm washcloth or a tissue, remove the residue. Bacteria can build up there, but it's more about the "ICK" factor than anything else. It looks gross and keeps the curler from functioning properly, a nice even surface is optimal. The padding will dent. It's inevitable. Most of the curlers I've used have come with replacement pads that are easy to remove and replace. Also, the life of an eyelash curler isn't long. 6 - 8 months at best. Thankfully they are fairly affordable so it doesn't hurt the pocketbook too much.

Let's look at the some basic models:


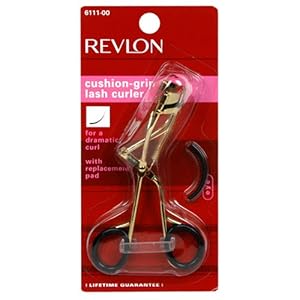
Revlon Cushion-Grip Lash Curler Eyelash Curlers
Revlon Cushion-Grip Lash Curler    

Revlon Eyelash Curler


Revlon Cushion-Grip Lash Curler  and Revlon Eyelash Curler. These two curlers from Revlon are good basics and fairly priced. The only difference between them? The grip. One has a rubber lining, the other doesn't. It's really about preference at that point. I've used both and can say they are user friendly.


For the brave:


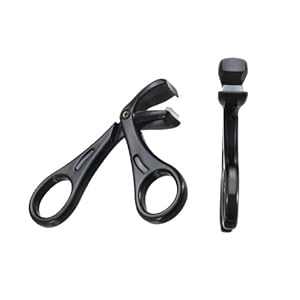
Japonesque Precision Lash Curler - Plastic
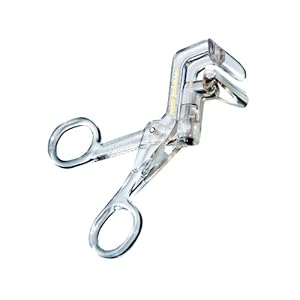
Tweezerman Super Curl Eyelash Curler
Tweezerman Super Curl Eyelash Curler   


Tweezerman Super Curl Eyelash Curler   - The Tweezerman Super Curl being clear plastic is helpful allowing you to see where the plate is going and how close you're getting to your lashline. Also if you need to turn the curler and angle it, it helps to see where your going. (I like to make sure the outside lashes get extra curled, so I angle the curler on my eye to catch every outside corner. The outer lashes in the curler, the others not.)

Japonesque Precision Lash Curler - Plastic - The Japonesque Precision is terrific too, it's more comfortable for someone doing makeup on another person, but it takes longer to use. Using it yourself is easy, but it takes longer because you are going section by section. You can get deep curl easily from inner to outer lashline.

Once your lashes are curled, you are ready for your mascara. My choice at the moment is, as I wrote before, the CoverGirl Lash Blast 24 hour Mascara in Very Black because it keeps the curl integrity until you remove it.

Happy Curling Everyone!

Thursday, February 2, 2012

My little Pony - tail


Like many of you, I've struggled with dents, knots and tangles of hair wrapped impossibly around my hair bands for years. YEARS. Well NO MORE!

On a whim, I ordered these Ribbon Hair Ties by Sephora Collection months ago and I HAVE BEEN CONVERTED!

No longer do I have to struggle with the metal menace associated with most ponytail holders. You know what I'm talking about. That little demon connector that can make removal painful. Now there are "tag free" options and plastic bands as well, but those can snap or become so hopelessly stretched and tangled they must be physically cut out of your hair. And that, is. Awful!

These Ribbon Hair Ties are fashionable and tangle free (unless you REALLY try) and the soft pliable ribbon still hold even when active. I really like them, at $8.00 US for a pack of 8, they last too! When they do lose their shape, all you have to do is run them under some water, let air dry and they bounce right back! I have yet to have one snap or come undone. I bought some more just so that I have more color options.

Monday, January 30, 2012

So many brushes, how do you choose?

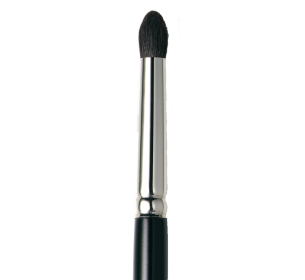
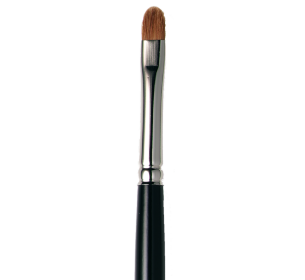
If you've ever wandered through a cosmetics department, you may have seen the utility belts stuffed full of makeup brushes strapped to the waists of makeup artists beating away at the faces of their clients. I've always loved a gorgeous set of brushes, but when I was one of those artists I understood the panic and confusion when a client would ask "but which brushes do I need?" I thought about it, and came up with a basic collection of three eyeshadow brushes for powdered eyeshadow (loose or pressed).
My favorite brand of brushes is Laura Mercier (all photos courtesy of LauraMercier.com) . While they aren't cheap, they are definitely the best brush for the long run. I've had my brushes for easily 8 years, and they are still in perfect shape with minimal maintenance.

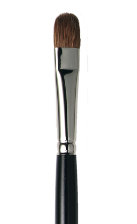
First, is the Eye Colour Brush. It's a basic brush with flat and tapered bristles and an oval tip, ideal for applying all-over lid color and brow-bone highlight colors.
Eye Colour Brush


Next is the Eye Crease Brush. Rounded with tapered bristles, allows for easy application to and above the crease (for "hooded" lids) and makes blending easier than with similar softer brushes.


Lastly, my favorite brush is the Corner Eye Colour Brush. This brush helps create the most sought after "smokey" effect by allowing for definition and gradual layering. Holding the brush vertical and along the top lashline, sweeping from outer corner in towards the center of the eyelid, a bedroom eye-smokey lashline is quickly and easily applied with whatever deeper shades you choose. Additionally, it makes taking that same deeper powder shadow and making a soft undereye smoke effect effortless.


Creating intense or natural looks are easier than you think, especially if you have brushes that you know how to use. Patience and practice is always recommended for beginners and remember, less is always better. You can always add on color or intensity, it's impossible to take it away (though with blending you can get pretty damn close). Don't be afraid to play with your eyeshadow!

Sunday, January 15, 2012

Eye can SEEEE you!! (just kidding!)

So I've been trying to take a decent picture of just my eyes for what I'm embarrassed to say about 2 weeks. I know. It shouldn't have been such a pain, but it was!
This post is a reference post and a "look, see!!" post in that I took a results picture from my Best Mascara I Ever Used post.

 
Here is my eye without any makeup. The lashes are virtually non-existent. The tips are blond-ish and with my McWhiterson skin, they get completely lost.


And here is that same eye, with the lashes curled and two quick coats of the Covergirl 24 hour mascara.
It's a pretty remarkable difference, even with just a simple curler.

Sunday, January 8, 2012

Getting the basics & High-tech product review

It's a two-fer!

With the multitude of options out there, it's easy to get confused on what is "right" for your skin care regimen. I say regimen because let's face it, (ha, face!) there are lots and lots of products out there geared towards the care of the face! Let's put all the toners, lifters, serums, alpha-hydroxy, outer space stuff aside for a moment and get the basics covered, shall we?
Here are (in my opinion) the only things a person truly "needs" to do to maintain their skin. Cleanse. Hydrate. Exfoliate.
That's it! Allow me to break it down further.

1. Cleanse - From makeup to pollutants, the face gets dirty. Try not to think about it too hard or you'll end up afraid of your own face. (ACK! Bacteria!) A gentle cleanser is something that should be in every bathroom. Whether it's in cream form, towelette form, gel form, oil form; whatever, a good basic cleanser is a must. I prefer to abide by this rule: Treat your skin the way you want it. Translation - if you WANT oily skin, use the cleansers geared toward Oily Skin. I know, that sounds backwards. "Who wants oily skin??" Think about it though. The primary reason skin can be oily (other than genetics or ethnicity) is stripping. Not the kind with g-strings and glitter; but when all the natural moisture is taken away, leaving the skin "squeaky" clean and tight. That is actually a bad thing! It causes the skin to go into overdrive to replenish pumping out excess moisture (oil) to try and compensate; but THEN the dry skin that's on the top layer actually can get caught up and mixed with the dirt and crud in the air and clog your skin up, resulting in a break out. And a never ending cycle. That's very very common. It also has created a multi-billion dollar dependency. However, I digress. Think about trying a basic, gentle, normal cleanser (labeled normal) or normal to dry or something that says "normal" or as close to it as you can. You want a balance in your skin. Removal of the uck without taking the good stuff with it. A dear friend of mine wrote about washing your face with a combination of oil which I must admit makes me want to try it! Find what works for you, but try and open your mind about what your skin can be like. Don't mentally lock in to "dry" or "oily", give your skin the benefit of the doubt.

2. Hydrate - Every skin needs a little touch of something moisturizing. More often than they realize, people with "oily" skin need the heavier moisturizers because of the dry surface (that's causing the excess oil, see above rant) area they have inadvertently caused. Some people use separate day and night moisture (I do!) and some people don't. Whatever you use, use it. You don't need to slather anything on (other than sunscreen) heavily, a light touch of moisture is best. By the way, that means eye cream too. I know, I know. Usually people say "but but that's separate??"; yes. It is. Again, a light eye cream shouldn't be expensive and it's more dense than regular face moisturizer. The eye area is delicate and yes, should have it's own moisturizer. Always put it on along the orbital bone and with your ring finger (it's the weakest) and it should take little time to absorb. If it's too thick it will stay on the surface and do you no good. That's true with any hydration; facial or body.

3. Exfoliate - This one is the forgotten. Helping along the natural shedding process of the skin makes everything work better with skin care. I don't recommend highly abrasive cleansers (with sand/pits of fruit) because what they do is gouge deeper than you realize into the skin surface resulting in a dryer appearance and feel; instead of sloughing off the cells evenly. Rounded bead type elements work best. OR some sort of brush system. However fingers and hands work just fine. The denser packed the beads are, the smoother your skin will be. If there's more "cleanser" than bead, that means you aren't getting as much exfoliation as you think you are. It should feel scrubby without feeling scratchy.


Ok! Those are the basics! Don't get me wrong, I have a love of the serums and such too, but if my skin starts to act up or not be the way I want it; I go right back to the basics.


Here's a high-tech find for you: The Clarisonic Mia 2 as seen in Sephora, Ulta, and QVC (though QVC may be out of the Mia 2).

It's a sonic cleansing system (yay for sonic! sorry, I'm a Whovian) that vibrates your skin so you're actually getting a lot more benefit from everything! It's not cheap, at all. But it's the one that works! It cleanses AND exfoliates gently (I don't have to use a separate exfoliation product) and allows my moisturizer to absorb quicker and I use less because it goes further! I use one pump my basic cleanser, Aveeno Positively Radiant with my Mia 2 morning and night. Avoiding the eye area (hey, it's a sonic brush. You can't use it on your eye). the new Mia 2 has a self-timer ( two 20 second time frames on the T-Zone areas, and a 10 second time frame for each cheek) so you know when to move on to the next section. The Mia 2 is one minute of my morning and night skin care regimen that I'll gladly perform. It's not cheap, but it's one of the best purchases I ever made.

Monday, January 2, 2012

Happy New Year!!

I probably should've posted about this fantastic find before the New Year, but hey it wasn't readily available (I'm not sure it's even worldwide released yet!) and I needed to give it a good solid try so I could gather my thoughts. Here goes:
THIS IS THE BEST MASCARA I'VE EVER USED!! I do not use those words lightly. I've become somewhat of a joke among my girlfriends because I'm always looking for new mascara. I follow the not-so-widely-known-nor-practiced rule of Department Store Mascara should be replaced after 3 months, Drugstore Brand Mascara should be replaced after one month. The discrepancy has to do with the levels of preservatives in the formulas and that clumpy-lumps that cling to the bristles and your lashes are the results. Never mind the bacteria (barf!) I know some people not only don't know the rule, but they don't really care. It's up to you, but I would rather shell out a few bucks for a fresh tube than fight the uphill battle of trying to separate my lashes from one another from a cruddy mascara application. MOVING ON!
See above: RE BEST MASCARA:
This is the newest member of the CoverGirl LashBlast Family, however I've yet to see it turn up on the website. I've been a fan of the chubby tubed LashBlast since it launched, however I was dissatisfied with the curl hold. It gave volume in spades, but one half coat too many and my lashes would lose any and all curl. So on with the search I went. With the release of this newest formula, I can say, with complete conviction that this mascara meets all the criteria of amazing.
  1. Volume - LashBlast is known for volume, the brush helps to build up volume in lashes without leaving bulk
  2. Hold - I curl my lashes the way I like then apply the mascara. Once I'm done with the coating, the curl will stay all day until it's time to wash my face. I have yet to experience any loss of eyelash curl throughout my wear. That's remarkable! Usually there's at least some, but not with this little beauty!
  3. Length - just like the other LashBlast mascaras, I find the "added length" to be adequate. Unless a mascara has actual fiberous elements (which can flake off and irritate the eye), most lengthening mascaras don't actually add to the lash. Since most lashes are blonde at the tips or lighter brown, adding color (aka mascara) makes the hair look longer. It's an illusion.
  4. Wear - Since I haven't seen a commercial or ad print about it, I don't know if they are touting CoverGirl LashBlast 24 hour mascara as waterproof, and I prefer non-waterproof formulas of mascara (they tend to make my lashes brittle in the long run) so I can't say for sure if they will in the future. There's no flaking or fading and my lashes aren't hard or crunchy. However I can tell you from experience, this mascara must must must have a separate makeup remover in order to get it off. I tried the baby shampoo trick I posted about, but that mascara barely smirked at it. I tried an oil based makeup remover, and had to use it 3 times at least before washing my eye area with the baby shampoo. I ended up buying the CoverGirl Makeup Remover which is a creamy remover and using a cotton round, found that it works the best. However, I definitely recommend doing the baby shampoo trick after since it leaves the eye area covered in residue.
So there's my first recommendation of 2012! CoverGirl LashBlast 24 hour Mascara, follow this link to an Amazon storefront with the details on the ingredients, you can also find opportunities to purchase on ulta.com, target.com, soap.com, etc.